
Curriculum Mapping / Pacing Guides
Curriculum Mapping allows teachers to see when your school has outlined each standard to be taught, conveniently from their lesson plans. This is a living document — when changes are made, teachers have immediate access to the revised document. This valuable planning tool helps teachers to begin with the end in mind and plan for meaningful instruction across the curriculum.
Curriculum Mapping / Pacing Guides
Curriculum Mapping is an added feature that is purchased separately from My Lesson Planner.
This feature can be added to any school or district purchase. Please use the Contact Us link to request pricing options. If you have purchased Curriculum Mapping, and it is not showing on your list, please Contact Us so that we can set up the security for those who will be entering your curriculum maps
Curriculum Mapping / Pacing Guides are designed to help teachers begin with the end in mind. My Lesson Planner brings your curriculum maps (pacing guides) into the standards so that teachers have quick and easy access to these documents to help guide their instructional lesson planning. Your objectives can be aligned with your standards (i.e. TIA) and can be brought into your lesson plans with one click when you choose your standard.
You can use the Curriculum Mapping tool in My Lesson Planner as you are planning your pacing guides, by choosing the quarters where they will be taught as you are planning. If you are using a pre-existing curriculum map, you should have your curriculum map documents organized by the SLEs with the quarter(s) in which each one will be taught. (For Example: AR.K-8.4.Math.M.13.05 Quarters 2 and 3). If your document is organized quarterly, as most are, with the SLEs listed within each quarter, it will take a bit longer, and you will have to repeat steps, but you can still work with a document that is organized in this way. The first thing you need to do is go to the Manage Tab page, and scroll down until you seeSchool on the left. Click on Curriculum Map.

You will then see the standards for your state. Expand the tree until you reach the specific set of skills with which you would like to work. Once you have worked your way down to the last level, you will see something similar to this:
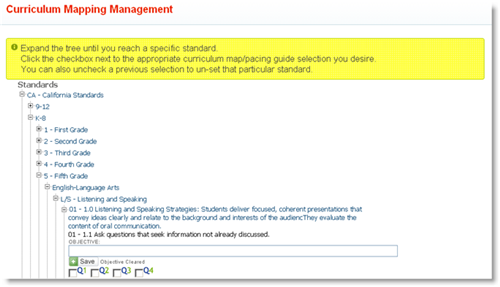
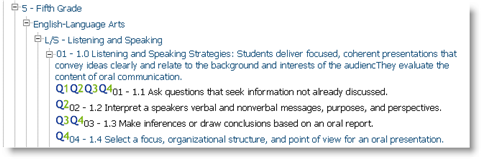
Choose the quarter(s) in which each particular skill will be taught. If you have pre-aligned objectives to your standards, you can type or paste the objective in the box. Be sure to avoid special characters like the ampersand and the apostrophe. Click Save. Continue with each skill (and objective if needed), clicking Save for each skill until you have completed the curriculum mapping for each grade or subject. You can stop and start at any time while you are planning your curriculum map/pacing guides. As you are adding objectives and specifying teaching quarters, your curriculum map will look similar to this. (The Success indicator, shown highlighted in the example image, should appear after you save each entry.)

If your curriculum maps do not include pre-aligned objectives, the objective box will simply remain blank. If you need to remove an objective, just highlight and delete, and then click SAVE. Make sure you see the message-- OBJECTIVE CLEARED --after you click SAVE. If it is not there, you have only deleted what was in the box, and have not clicked on SAVE.
Once you have entered the curriculum maps, the quarters where each skill will be taught will show next to the skill on your standards tree or standards search list.
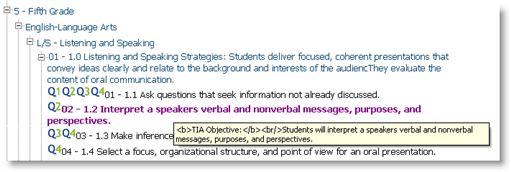
If you have entered pre-aligned objectives, they will show when you mouse-over a standard. While writing lesson plans, when the standard is clicked , the pre-aligned objective will automatically enter in the objective box of your lesson plans.
If your school is using pre-aligned objectives, all teachers will need to make sure the SHOW OBJECTIVE and SHOW ALIGNED OBJECTIVE options are marked as YES in Preferences.
